Thursday, January 14, 2010

The Doppler Effect Socks


The Doppler effect is the change in frequency of a wave for an observer moving relative to the source of the wave. It is commonly heard when a car with a siren approaches, passes and goes away from the observer. The received frequency is higher during the approach, it is identical at the instant of passing by, and it is lower during the recession.

Another use of the Doppler effect, which is found mostly in plasma physics and astronomy, is the estimation of the temperature of a gas (or ion temperature in a plasma) which is emitting a spectral line. You will see what comes towards you with a blue-shift colour, and what goes away from you a red-shift colour.


If you are not on the same wavelength as your family, you can give them a pair of doppler effect socks, but concentrate on the red-shift part of the pattern. ;-)


The Pattern is very easy:
Use your favorite sock pattern. I made them toe up, but they can be knitted either way. 
Toe up, the toe was made blue (walking in somebody's direction they will see the blue stripe first according to the doppler effect blue-shift of cause) 


With needle size 2mm, and Wollmeise Sock Yarn (or similar), the pattern is like this for size S/M:
Blue toe, CO 12 +12 sts and increase until 68 sts. (Top down CO 68 sts)
Whatever heel you choose to make,make it where marked *. This way the shortest wave lengths will be on the middle of your sock and foot.
Red stripe: 10 rows
Blue stripe: 10 rows
Red stripe: 8 rows
Blue stripe: 8 rows
Red stripe: 6 rows
Blue stripe 6 rows
Red stripe 4 rows
Blue stripe 4 rows
Red stripe 3 rows
Blue stripe 3 rows
Red stripe 2 rows
Blue stripe 2 rows
Red stripe 1 row
Blue stripe 1 row
Red stripe 1 row
*make the heel 
Blue stripe 1 row 
Red stripe 1 row
Blue stripe 2 rows 
Red stripe 2 rows
Blue stripe 3 rows
Red stripe 3 rows
Blue stripe 4 rows
Red stripe 4 rows
Blue stripe 6 rows
Red stripe 6 rows
Blue stripe 8 rows
Red stripe 8 rows
Blue stripe 10 rows
Red stripe 3 rows stockinette and then make rib (K1tbl P1  until the rib is as long as the toe.


If you need a larger size, just make the toe and the rib longer.
Embrace your inner nerd, and wear with pride!

Thursday, December 31, 2009

Johan's Pullover


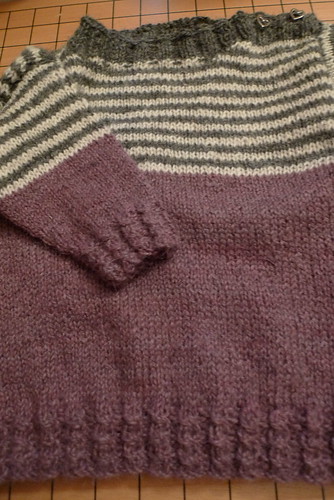
Johan is my new nephew, 2 weeks old. This pullover will keep him warm for a few months, the size is for 0-6 months.


Yarn: Something that gives 10 cm = 21/22x34 stitches. I used Sajama Alpaca and needle 3 mm.
If you don't like to knit swatches, start with an arm, it is far less to frog if it turns out wrong.

You need:
Yarn in 3 colours, I used around 70 g plum, 25 g nature white and 40 g nature black. Needles size 3, dpn's for arms and a circular for the yoke 2 cute buttons for the shoulder, a needle to weave in ends, attach the arms to the yoke, and to sew on the buttons.

CO: 120 sts and knit around.

The cable rib is knitted like this:
1: P2, K2 repeat
2: P2, K2, repeat
3: P2, slip one st on a needle behind the work, K1, K the slipped st. repeat (an easier way to knit this cable is to leave both sts on the needle, but knit st number 2 first without slipping the first st off, and then knit st number one, and slip both sts off together)
4: P2, K2 repeat
Knit until rib is 3,5 cm

Yoke: Continue knitting around with plum (or your own main colour) until work is total of 18 cm
Now part front and back and knit across 60 sts, and purl back 60 sts in black and white stripes.
Each stripe is K1 row, P1 row.

Front: After 10 cm you round the neck like this (while continuing the stripes):
Left shoulder (the right side facing you)
Knit 20, turn, P2tog, purl all sts, turn
Knit all, turn P2tog, purl all, turn
Knit all, turn, P2tog, purl all, leave sts on a needle or stitch holder.

Count 20 sts for the neck, leve these also on a needle

Right shoulder (or left facing you)
K2tog, K all, turn, Purl all, turn
K2tog, K all, turn, Purl all

Back:
Knit stripes until you have the same amount of stripes as the front. It should measure 30 cm total.
Leave all sts on the needle. Put away and knit arms.

Arms: CO 32 sts on dpn's and knit cable rib around for 3,5 cm as described.
After rib, increase 2 st each 4th round under the arm. I increase on each side of 2 sts.
Knit Plum (main colour) for a total of 9 cm with the rib and change for stripes. Knit stripes (remember to increase) until the whole arm is 17 cm and cast off loosely. The arm might look very short, but babies are strangely proportioned.
In case you forgot; make one more arm, just like this one.

Collar and finishing:
Now start to attach the different parts together: I left the stitches on the shoulders to avoid seams there, so use grafting (sewn or knitted) to put together the right side shoulder (left facing you).

Now knit all stitches from the front side of the left shoulder with black yarn, pick up 6 sts where you rounded the front neck, knit all the 20 front stitches, pick up 6 sts on the other side of the rounded neck, and knit all the back stitches. Now knit and turn across all these stitches K2, P2 4 rows
Make buttonholes the next row like this: Work K2,P2 according to your work 4 sts, cast off 2 sts, K&P 4 sts cast off 2 sts, continue working K2/P2 across work. Turn. Work knit 2 and purl 2 as usual until you get to the button holes. Work 2 sts in the end st and connect the hole to the work again. K/P 4 and repeat with the other button hole. K/P last 4 sts. Turn and work 3 more rows ending with the front facing you. Cast off loosely.

Block all parts before joining them. If the yarn tolerates it, use a steam iron.
Sew the left shoulder collar short ends (where the arm starts) together, laying flat on top of each other. Sew on the buttons.
Join the arms and sew on. I like to start on the top of the arm working my way down, in case I have to hide a few rows of sin (if it doesn't fit properly), better to hide it under the arm than on visible places.

Weave in ends, and you have a baby pullover!

Saturday, July 18, 2009

Small things that makes me happy

Untangling my knitting and having a cup of green tea, early in the morning in my garden.

Discovering how my son explained to me what kind of coffee he bought.

A brand new, and beautiful sketchbook. Just like a new toy.

A little friend to keep my breakfast egg warm.

And of cause there are more socks. More details on my Ravelry page:
Baby Monkey Socks

Something Socks (personal pattern)

Lavender socks (personal pattern)

Even more Baby Monkey socks.

Tuesday, March 17, 2009

Finishing things, season 2, version 5


Mønster: Cable Rib Socks, Erica Alexander
Garn: 130 g Hacho, 100 Merino Hand dyed
Pinner: 5 stk Harmony woods str 2,75
Final Verdict: Ble umiddelbart tatt i bruk av junior.
Jeg har brukt mye tynnere pinner enn anbefalt for å få tett og fast og mer slitesterk tekstil.
Likevel er helene forsterket på innsiden i tillegg til en strikket forsterket hel, (sokkene skal tross alt brukes av en mann). Ekstraforsterkningen har jeg gjort sånn:


Vreng sokken. Det skal da ikke SYNES.


Finn fram stoppetråd i passende farge. Jeg har brukt den mest synlige til tross for at jeg er meg, for at dere skal kunne se hva jeg har gjort.


Finn fram en stoppesopp, fordi det er morsomt. Det gjør det litt enklere å sy også.
Tre i dobbelt tråd for tykt garn, enkel tråd for tynt garn. Det går an å bruke forsterket sokkegarn også, men da blir helen tykk.


Sy fram og tilbake under annenhver vrangmaskerille, langs hele helen. Jeg forsterker helen på undersiden av foten også.


Og vips, en usynlig forsterket hel og sokken varer to dager mer enn forventet.

Saturday, February 21, 2009

kaos lærer seg selv å sy - uten mønster

Jeg var på IKEA og ringte junior: "Er det noe du trenger?"
"Skittentøykurv",svarte han. "Helst en fin en, i tre."
Det fantes ikke. Hverken fin eller i tre. Så til slutt dro jeg hjem et skaberakel av et stativ, med noe som lignet på en søppelsekk hengende over. Skulle jeg først dra med meg noe herk hjem, burde det i det minste ikke koste mer enn 19 kroner.


Men man kan bare ikke ha noe så grønnjævlig i huset, så etter mye om og men, spretting av sømmer, sy fast pekefingeren i en sidesøm og å ha lært at borrelås med lim på baksiden tetter igjen nåløyet, ble dette resultatet:

*stolt*

Friday, January 2, 2009

Finishing things, season 3, version 1

Ørepynt for spesielt interesserte. De forsvant sabla fort ned i veska til Ma-2, nå håper jeg vi får se dem i bruk!
Jeg skal lage mange. Rester av garn jeg har blitt ekstra glad i ligger klar. Nå mangler jeg bare tid. Jeg ønsket meg en ekstra time på døgnet - sånn mellom sju og åtte et sted - til jul, men aldri får jeg noen ting.

Mønster: Mitt eget
Hvorfra
: Min merkelige hjerne
Garn: Shibui Sock (restegarn)
Pinner: pølsefingrene mine
Final Verdict: Skal bli mange flere. Disse var morsomme å lage, og kan bli fine gaver.


Mønster: Swallowtail
Hvorfra
: Evelyn Clark
Garn: Rowan 4 Ply Soft 150 gram naturhvitt, og en rest plommefarget.
Pinner: 3,5
Final Verdict: Jeg hater nupper, men det hindrer meg ikke i å lage flere og flere og flere og...

Wednesday, December 10, 2008

Pacmangenserprogresjon... eller ikke

Det er ikke så enkelt å strikke genser når katten eksproprierte arbeidet for å bruke den som seng.
Jeg prøver å lure ham ut, men den ørkenkatten nekter å besudle sitt legeme med frost, så den kikker foraktelig på meg der jeg står og vifter med armene og peker på verandadøra. Av og til klarer jeg å lokke den vekk fra genseren med litt kylling i matskålen, eller tilbud om å heller sove på en kasjmirgenser. Og hvis jeg da endelig klarer å tuske til meg genseren... da skal droget sove på armen min istedet.


Hvorfor kan du ikke bare slenge vekk dyret? - spør dere kanskje nå. Og om dere spør det, ja da har dere aldri prøvd å argumentere med en siameser. De får alltid siste ordet. Og det ordet er som regel meget høylytt.